Blog

-
Step-by-Step Guide: How to Replace a Holden Commodore Key Shell, Case & Buttons
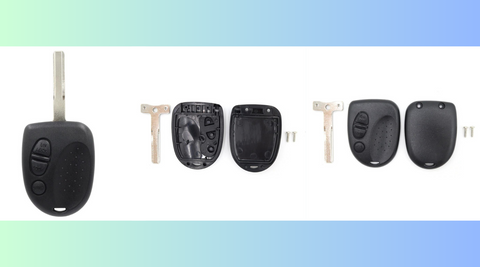 Are you frustrated with worn-out rubber buttons on your Holden Commodore key? You're not alone; it's a common issue.The good news is that finding a replacement for your Holden Commodore key shell is a simple solution. With the help of our instructional video, you'll have a fresh-looking key in no time.In this guide, we'll walk you through the process. Whether you have a two-button or one-button version, we've got you covered.
Step 1: Gather Your Materials
Before you begin, make sure you have the following items on hand:- A new Holden Commodore key shell
- Your old key with worn-out buttons
- A small screwdriver
- A pair of pliers
Step 2: Remove The Old Key Shell
Follow these steps to remove the old key shell:- Use a small screwdriver to carefully pry open the key fob. Be gentle to avoid damaging the internal components.
- Once the key fob is open, use the screwdriver to release the old key shell from the internal housing.
- Carefully remove the old key shell, taking note of how it's positioned within the housing.
Step 3: Replace With The Old Key Shell
Now, let's replace the old key shell with the new one:- Take the new Holden Commodore key shell and place it in the same position as the old one within the key fob housing.
- Ensure that the new key shell is securely in place.
Step 4: Reassemble the Key Fob
Follow these steps to reassemble the key fob:- Carefully put the key fob back together, ensuring that all components align correctly.
- Press the key fob halves together until they snap into place.
Step 5: Test Your Key
Before you finish, test your newly replaced key to ensure all buttons work correctly. Press each button to verify their responsiveness.Summary
Congratulations! You've successfully replaced the key shell, case, and buttons on your Holden Commodore key.This simple fix has given your key a fresh look and renewed functionality. Whether you had a two-button or one-button key, hopefully this guide has helped you through the process.For more helpful tips and automotive solutions, stay tuned to our blog. If you found this guide valuable, don't forget to share it with fellow Holden Commodore owners who might be facing the same key issues.Remember that maintaining your car's key is essential for smooth operation, so don't hesitate to address any issues promptly.If you have any questions or need further assistance, feel free to contact us.Instructional Video:
-
Garage Door Security: Fortifying This Vulnerable Part of Your Home
Maintaining the security of your house is no doubt a top priority. As a responsible homeowner, you probably invest heavily in enforcing the security of your front/back doors and windows.
But we bet you forget to pay attention to another key entry point to your home: the garage door.
The garage door is not only usually unoccupied, but is also full of re-sellable items. There’s this black market demand for power tools, equipment and accessories related to family vehicles. Stereos, GPS systems and other stuff left in the car are easy to swipe as well. This double whammy means that thieves have all the time in the world to steal anything of value. With a simple calculation of the cost of replacing these things, it is obvious why your garage door security should be top-notch.
At Remote Pro, we offer a few guidelines on securing such a vulnerable part of a home.
Fortify with Quality Deadbolts and Hinges
Make sure your garage door is just as protected as your front door. To do so, install a high-quality deadbolt, and reinforce the hinges to resist a brute-force attack. If possible, we also suggest upgrading to a strong, sturdy door made of reinforced steel or solid wood.
Install a Security System
Installing a security system in the garage is Home Security 101. You don’t need to invest in a high-end, expensive system; even a simple door sensor can be an effective burglar deterrent. If anyone tries to enter when the system is set, an alarm will go off and can alert the police.
Take the Remote with You
One of the major garage security no-no’s is leaving the remote to the garage door in your car. It’s simple: if someone breaks into your car, they can steal the remote and can easily access your garage and your home.
A smart solution here is to exchange that remote you clip to your visor to a keychain remote opener, such as the ones we offer here at Remote Pro.
We have more than 500 garage door remotes you can choose from, which means you can trust us to meet your automation needs. Just name it and we will ship it to you, wherever you are in the world.
Order a garage door remote through our site today. -
Hyundai Flip Key Shell Replacement Guide - DIY Key Shell Replacement
How to Replace Your Hyundai or KIA Flip Key Shell
If your Hyundai or KIA flip key has seen better days and is showing signs of wear and tear, you might be wondering how you can give it a fresh new look without having to replace the entire key.
Fortunately, you can easily replace the key shell to restore its appearance and functionality. In this guide, we'll walk you through the steps to replace your Hyundai or KIA flip key shell, ensuring it looks and works like new.
Step 1: Open the Old and New Key Shells
Start by carefully opening both the old and new key shells. Be cautious when handling the old key shell as there is a spring inside that you'll need to watch out for.
Step 2: Prepare the Old Blade for the New Shell
Take a moment to prepare the old blade for placement in the new shell. This step is crucial to ensure that your key will work smoothly with the new shell.
Step 3: Remove the Circuit Board and Battery
From the old key shell, carefully remove the circuit board and battery. These components will be transferred to the new key shell, so keep them safe.
Step 4: Carefully Handle the Transponder Chip
Gently break away the plastic surrounding the transponder chip from the old key shell. Take your time to avoid damaging the chip.
Step 5: Remove Glue Around the Transponder Chip
There might be residual glue on the transponder chip. Make sure to cut away any excess glue to ensure a proper fit in the new shell.
Step 6: Transfer Transponder Chip, Battery, and Circuit Board
With the transponder chip, battery, and circuit board freed from the old key shell, carefully transfer them to the new key shell. Be precise in their placement to ensure proper functionality.
Step 7: Secure the New Case
Close the new key shell, and use the provided screw at the back to secure it in place. This step is crucial to ensure the key remains intact and functional.
In conclusion, replacing your Hyundai or KIA flip key shell is a straightforward process that can breathe new life into your old key. By following these simple steps, you can enjoy a fresh-looking and fully functional key without the need for a complete replacement. Don't let a worn-out key shell inconvenience you; take matters into your own hands and give your key the makeover it deserves.
-
Boss Garage Door Remote Programming: How to Code a Boss 2211-L Remote to a BRD1 Motor
If you're looking to program a Boss 2211-L remote to your Boss/Steel-Line BRD1 motor, you've come to the right place. In this guide, we'll walk you through the process step by step to ensure a hassle-free garage door remote programming experience.
Instructions
Step 1: Access The Motor Control Panel
Start by removing the faceplate of your wall-mounted motor control panel. You'll find a tiny slot at the bottom centre of the grey faceplate, which allows you to insert a flat screwdriver and easily remove the cover. This step is essential to access the radio set/learn button.
Step 2: Locate and Activate the Learn Button
Once the faceplate is removed, look for the radio set/learn button, typically a small circle button in red or black. Push this button once. As you do so, a light will illuminate, indicating that your motor is now ready to accept a new remote.
Step 3: Program Your New Remote
With the motor prepared, it's time to program your new Boss 2211-L remote. Press any button on the remote that you want to use for operating the garage door. After pressing the button, release it. On the motor control panel, you'll notice a learning light that will blink to indicate that the code has been successfully learned.
Step 4: Finalise The Programming
To complete the garage door remote programming process, push the learn/code set button on the motor control panel once and release it. Test your newly programmed remote to ensure it operates the door as expected. Finally, place the faceplate back onto the motor control panel, securing it in place.
Video Instructions:
By following these straightforward steps, you can effortlessly program your Boss 2211-L remote to your Boss/Steel-Line BRD1 motor, giving you the convenience of remote-controlled access to your garage. Whether you're setting up a new remote or replacing an existing one, this process ensures your garage door operates smoothly with your remote control.
In conclusion, programming your garage door remote is a straightforward task that can be completed in just a few minutes. By following the provided instructions, you can enjoy the ease and convenience of controlling your garage door with your newly programmed Boss 2211-L remote. Say goodbye to manual operation and hello to the convenience of remote-controlled access.
-
How to Programme a Garage Door Remote From Another Remote
Simplifying Your Remote Control Setup
Are you tired of juggling multiple remotes to operate your garage doors? Many homeowners face this issue when they have different types of garage door openers.
The good news is that there's a solution that allows you to use just one remote to control all your garage doors. In this article, we'll show you how to program a garage door remote from another remote, making your life more convenient.
Combining Remotes
Combining remotes is not always as straightforward as purchasing a new universal remote that can operate multiple doors. When you invest in a new remote, there are several factors you need to consider for it to work effectively.
These factors include the brand and model of your garage door opener motor, the frequency it operates on, and the model of the remote control itself. In most cases, all of these elements must align to ensure the new remote will function as expected.
In typical households, it's common to have multiple garage doors installed at different times, each utilising different remote control systems. As a result, you may find yourself carrying two or even three remotes with you at all times. This can be quite cumbersome and inconvenient.
How to Programme a Garage Door Remote from Another Remote
The most efficient way to use a single remote control for all your garage doors is to add a receiver to one of your garage door opener motors. This receiver, often installed by a garage door professional, acts as a bridge between your different systems.
It is a small device that connects to Motor A and allows the remotes that originally controlled Motor B to be programmed into the receiver, effectively giving them control over Motor A as well.
What's great about this setup is that all your original remotes will continue to work with Motor A as they always have. However, with the receiver in place, Motor B's remote will gain the added capability of controlling both motors.
This means that you can now operate all your garage doors with one remote, streamlining your daily routines and making your life more convenient.
Summary
In summary, if you want to eliminate the hassle of managing multiple remotes for your garage doors, programming a garage door remote from another remote is a practical and efficient solution.
By adding a receiver to one of your motors, you can simplify your remote control setup and enjoy the convenience of using a single remote for all your garage doors.
Say goodbye to the confusion and inconvenience of multiple remotes and hello to a more streamlined and efficient way of operating your garage doors.