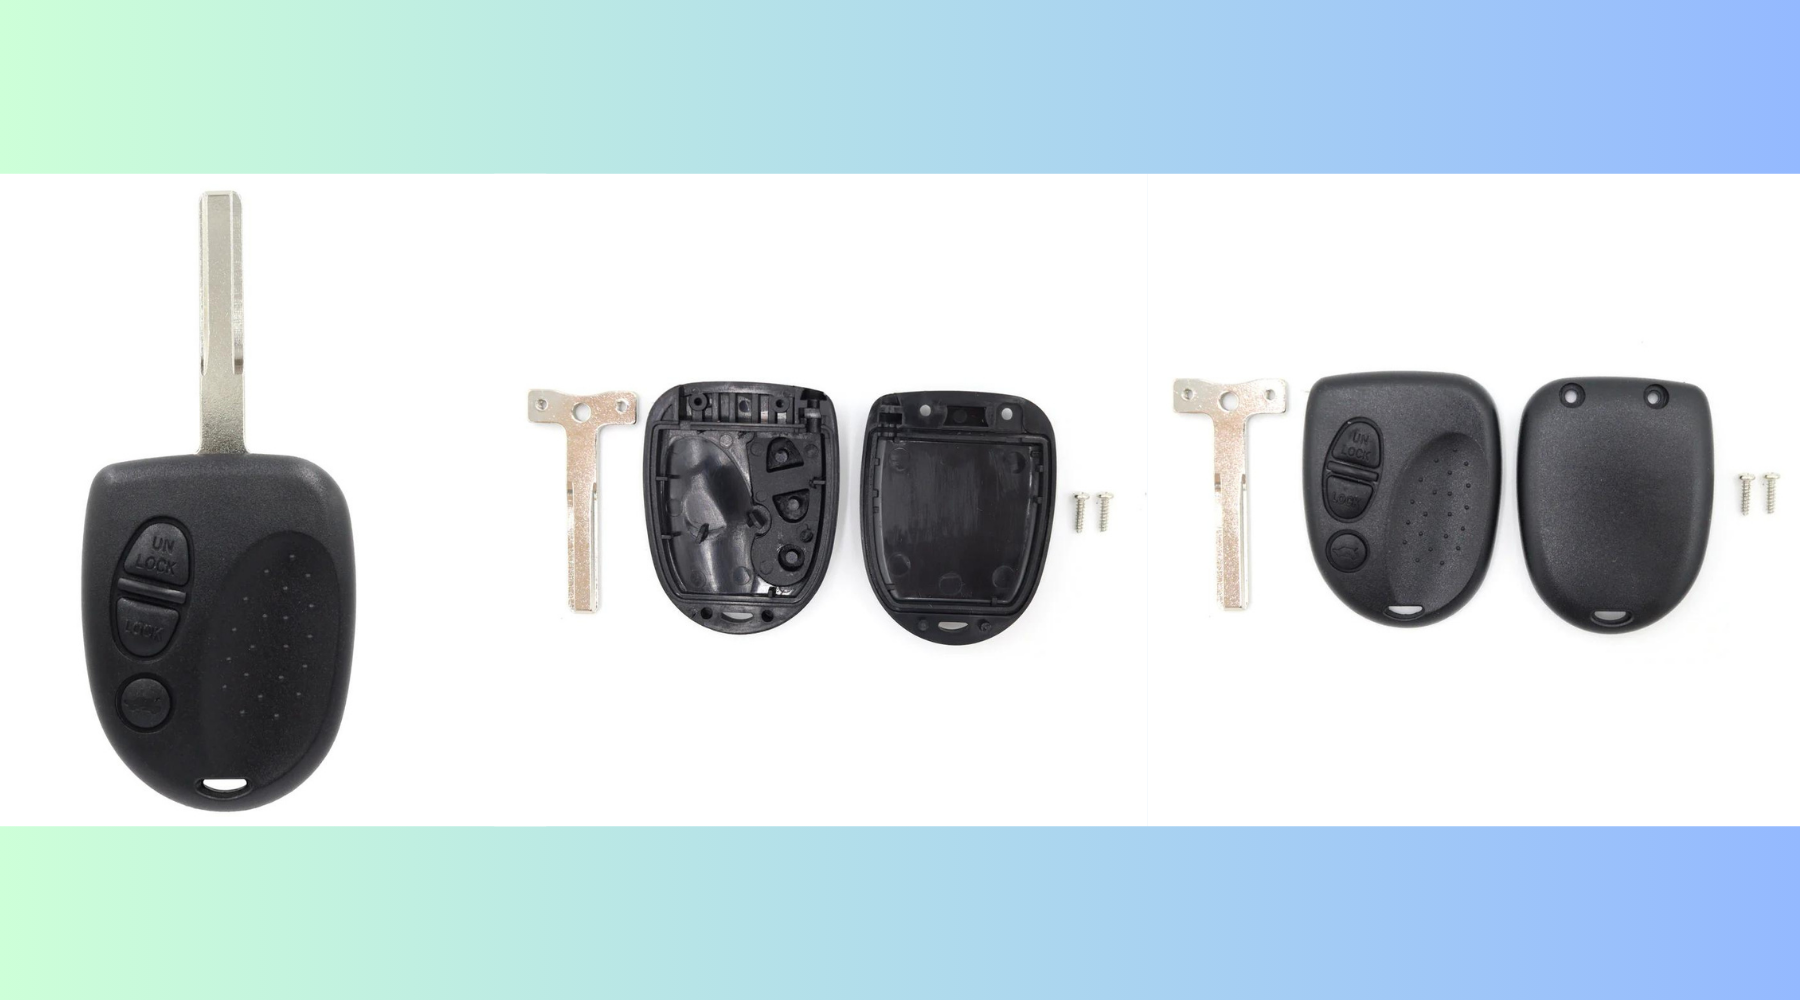
Loading
  • Replacement Battery For Subaru Key Fob Guide

    Posted by James Boyle

    Keeping your Subaru on the move requires more than just fuel – it needs a functioning key fob. If you've found yourself with a flat battery in your Subaru Forester, Impreza, Liberty, or Outback remote key, fear not. Remote Pro is here with a detailed yet straightforward guide on replacing the CR1620 battery, ensuring you stay in control of your vehicle effortlessly.

    Step 1: Identify the Battery Type

    The first step is to identify the battery your Subaru key fob needs. Generally, the required battery information, in this case, CR1620, is inscribed on the existing battery. Take a moment to locate this information before proceeding.

    Step 2: Open the Key Fob

    Using a small flathead screwdriver or your nails, gently pry open the key fob. Take care not to damage the casing during this step. Most Subaru key fobs have a seam along the edge where you can carefully insert the tool and pop open the case.

    Step 3: Remove the Old Battery

    Once the key fob is open, carefully remove the old CR1620 battery. Be mindful of the positive (+) and negative (-) sides of the battery. Note the orientation as you'll need to insert the new battery in the same way.

    Step 4: Insert the New CR1620 Battery

    Take your new CR1620 battery and place it into the designated slot. Ensure the positive and negative sides align correctly with the markings inside the key fob. Gently press down to secure the battery in place.

    Step 5: Close the Key Fob

    With the new battery snugly in place, it's time to close the key fob. Press the two halves together until you hear a satisfying click, indicating that the casing is securely closed.

    There you have it – a quick and easy guide to replacing the flat battery in your Subaru Forester, Impreza, Liberty, or Outback key fob. Following these simple steps ensures your key fob stays powered up, providing you with convenient access to your vehicle. Remember, use the recommended CR1620 battery for optimal performance. For more expert tips and solutions, stay tuned to Remote Pro – your go-to source for all things key fob related.

    Read more

  • A Quick Guide to Your Mercedes Key Battery Replacement

    Posted by James Boyle

    If you find yourself stuck with a Mercedes-Benz Class 3 remote key with a dead battery, fear not – replacing it is a straightforward process. In this quick and easy guide brought to you by Remote Pro, we'll walk you through the steps to replace the flat battery in your Mercedes key, ensuring you're back on the road in no time.

    Step 1: Unlocking the Key

    The first step in this simple process is to release the latch on your existing key. This action allows the safety blade to come out, granting you access to the inner components. To do this, use your nails if they are long enough or opt for a flat-blade screwdriver if needed. Gently insert the tool into the latch and apply a bit of pressure to release it.

    Step 2: Identifying the Battery Type

    Before diving into the replacement process, take a moment to identify the type of battery your Mercedes key requires. Generally, this information is written on the battery itself, and for Class 3 remotes, the standard is a CR2025 battery.

    Step 3: Removing the Old Battery

    Once the latch is released, carefully take out the old battery from its compartment. Use caution and ensure you're handling the key with care to avoid any damage.

    Step 4: Inserting the New CR2025 Battery

    Now, take your new CR2025 battery and place it into the battery compartment. Make sure the positive (+) and negative (-) sides of the battery align correctly with the markings inside the key. Gently press down to secure the battery in place.

    Step 5: Closing the Key

    With the new battery securely in place, it's time to close the key. Carefully slide the safety blade back into its original position until it clicks into place. Ensure that the latch is securely closed, and your Mercedes key is ready for action.

    Congratulations! You've successfully replaced the flat battery in your Mercedes-Benz Class 3 remote key. This quick and easy guide provided by Remote Pro ensures that you can perform this essential task without any hassle. Remember, always use the recommended CR2025 battery for optimal performance, and you'll be back on the road with a fully functional key in no time. For more tips and solutions, stay tuned to Remote Pro for all your remote key needs.

    Read more

  • BMW Key Battery Replacement: A Simple DIY Guide

    Posted by James Boyle

    Is your BMW remote key acting up due to a flat battery? Don't worry; replacing it is a quick and straightforward process. In this step-by-step guide, we'll walk you through the simple DIY steps to replace the flat battery in your BMW key for models including 3/5/7 Series, X3, X5, Z4, E38, E39, M5, and M3. The battery you'll need is a CR 2025, available for purchase here.

     Step 1: Open the Car Key Shell

    To begin the battery replacement process, use a small screwdriver to open the car key shell. Locate the seam along the edge of the key fob and gently insert the screwdriver to release the clips holding the two halves together.

    Step 2: Pop Out the Existing Flat Battery

    Once the car key shell is open, you'll find the existing flat battery. Carefully pop it out using the screwdriver or a similar tool. Be mindful not to damage the key or surrounding components during this step.

    Step 3: Insert the New Battery

    Now, take your new CR 2025 battery, ensuring the positive (+) side faces up. Insert the new battery into the designated slot in the car key shell. Press it down gently to secure it in place.

    Step 4: Close the Car Key Shell

    With the new battery in place, it's time to close the car key shell. Align the two halves, making sure they fit together correctly. Apply gentle pressure to snap the clips back into place. Use the screwdriver to secure any screws that may be present, ensuring the car key shell is tightly closed.

    If you prefer a hassle-free solution, you can purchase a complete BMW 3-button key remote here. Additionally, replacement cases/shells are available here for those looking to refresh the appearance of their key fob.

    With these simple steps, you can easily replace the battery in your BMW remote key, ensuring optimal performance and reliability.

    Read more

  • A Simple Guide to BFT Remote Programming: Step-by-Step Tutorial

    Posted by James Boyle

    Are you looking to program a new BFT genuine remote to your motor? You're in the right place. In this step-by-step tutorial, we'll guide you through the process of coding and programming your new BFT remote, ensuring a seamless integration with your motor system.

    To follow along, make sure you have both the existing programmed BFT remote and the new genuine remote, which you can purchase here.

    Programming the New Genuine Remote

    1. With the existing remote programming completed, move on to the new genuine BFT remote that you wish to program.
    2. Press and hold the top two buttons on the new remote simultaneously until the LED light becomes solid. This indicates that the new remote is ready for programming.
    3. Once the light is solid, release the buttons, and promptly press the button on the new remote that you want to assign to operate the motor.

    Following these steps ensures that your new genuine BFT remote is successfully programmed and synchronised with your motor system.

    This straightforward process allows for a hassle-free integration of the remote into your security setup.

    Remember, the genuine BFT remote offers not only reliability but also advanced features to enhance your motor's functionality. If you haven't purchased the new genuine remote yet, you can find it here.

    By programming your BFT remote using this simple guide, you can enjoy the convenience and security that comes with a seamlessly integrated motor system.

    If you have any questions or encounter any issues during the programming process, don't hesitate to reach out to our support team for assistance.

    Remote Pro is here to ensure that your experience with BFT remote programming is smooth and successful.


    Read more

  • Gliderol Remote Programming: A Step-by-Step Guide

    Posted by James Boyle

    Programming your Gliderol remote to the motor doesn't have to be a complex task. At Remote Pro, we've put together a straightforward step-by-step guide to make the process hassle-free. Whether you have a genuine Gliderol remote or an aftermarket one, follow these simple instructions to get your remote programmed in no time.

    Step 1: Remove the Light Cover on Your Motor

    Start by locating the light cover on your Gliderol motor. Carefully remove the cover to reveal the internal components. This step allows you access to the learn button on your motor.

    Step 2: Press the Learn Button on Your Motor

    Identify the learn button on your Gliderol motor. Press the button, and you should see a red light illuminate. It's crucial to note that if the red light doesn't illuminate beside the button you pressed, you might be using the wrong button. Double-check and ensure you're pressing the correct one.

    Step 3: Press Button A or Button 1 on Your Gliderol

    Remote Within five seconds of pressing the learn button, grab your Gliderol genuine or aftermarket remote. Press either Button A or Button 1 – the specific button may vary depending on your remote model. The red light on the motor will go out, indicating that the remote has been successfully programmed.

    Step 4: Remote Successfully Programmed

    Congratulations! Your Gliderol remote is now programmed to the motor. The red light going out is a clear indicator that the process is complete. You can now enjoy the convenience of controlling your Gliderol motor with your newly programmed remote.

    Order Your Gliderol Remote Today

    Ready to upgrade or replace your Gliderol remote? Explore our range of genuine and aftermarket Gliderol remotes at Remote Pro. For a cost-effective solution, check out our aftermarket Gliderol remote.

    If you prefer the genuine Gliderol experience, consider our Genuine Gliderol Remote. Enhance your garage door experience with Remote Pro today!

    Read more